
Newsletter 10/2026
Our goal is to create a place where people come to when they want to be informed, surprised and inspired about fishing in Curaçao. (DR. B)
SUBSCRIBE & RECEIVE
NEW ARTICLES FIRST
PENN Performance Reels


Difference between Slow and Fast action Rods
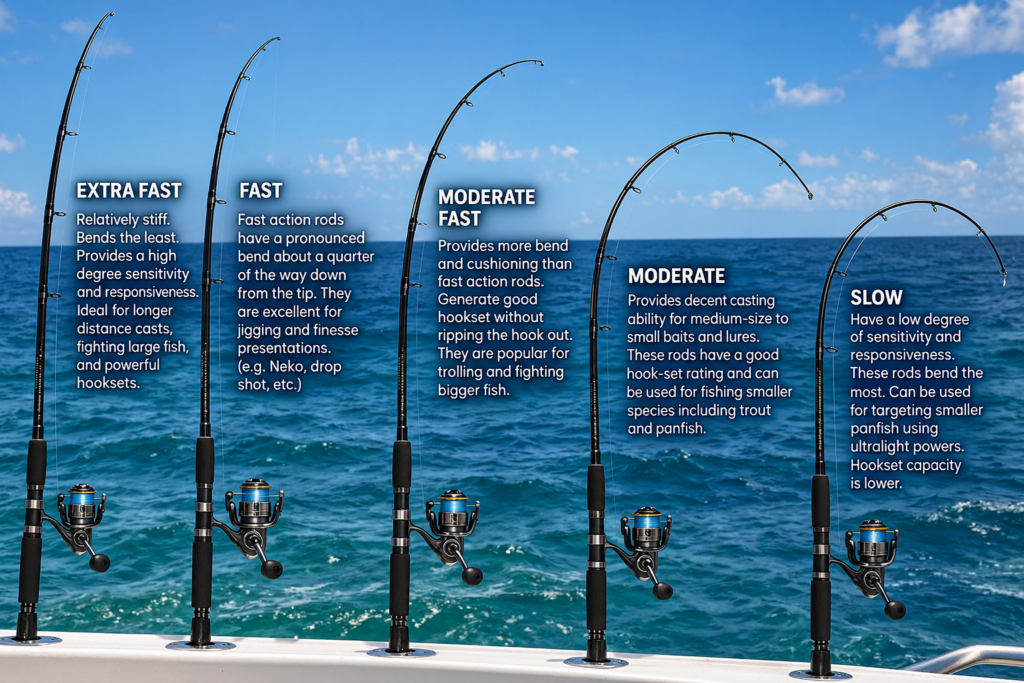
The main difference between fast and slow action fishing rods is where the rod flexes when you apply pressure or cast.
Fast Action Rods
- Where it flexes: Only in the top 20% to 30% near the tip.
- Feel: Stiff and snappy.
- Sensitivity: Very high; you feel subtle bites, rocks, and structure immediately.
- Hooksets: Quick and powerful because the lower blank stays rigid.
- Best used for: Single-hook lures, bottom-contact jigs, soft plastics, and heavy cover. You can learn more via Shimano Fish.
Slow Action Rods
- Where it flexes: Almost the entire length of the blank, down near the handle (parabolic bend).
- Feel: Deeply flexible and “bouncy” or soft.
- Sensitivity: Lower, because the deep bend absorbs vibrations before they reach your hand.
- Hooksets: Slower and more forgiving; acts like a shock absorber.
- Best used for: Treble-hook lures (like crankbaits), panfish, or situations where you need to prevent a fish from tearing the hook out of its mouth.
How to make a Fishing Rod Holder from a Broken Fan
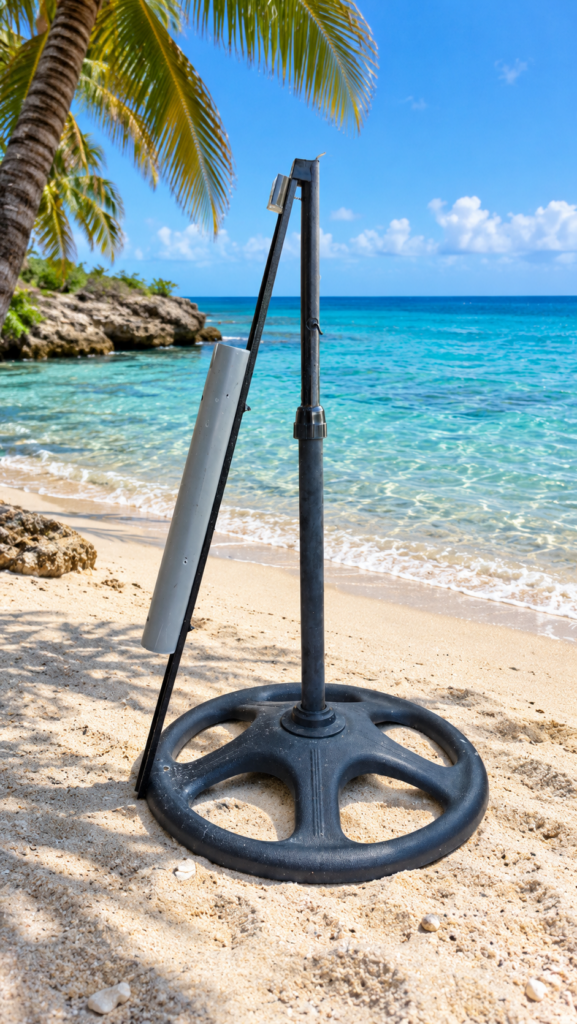
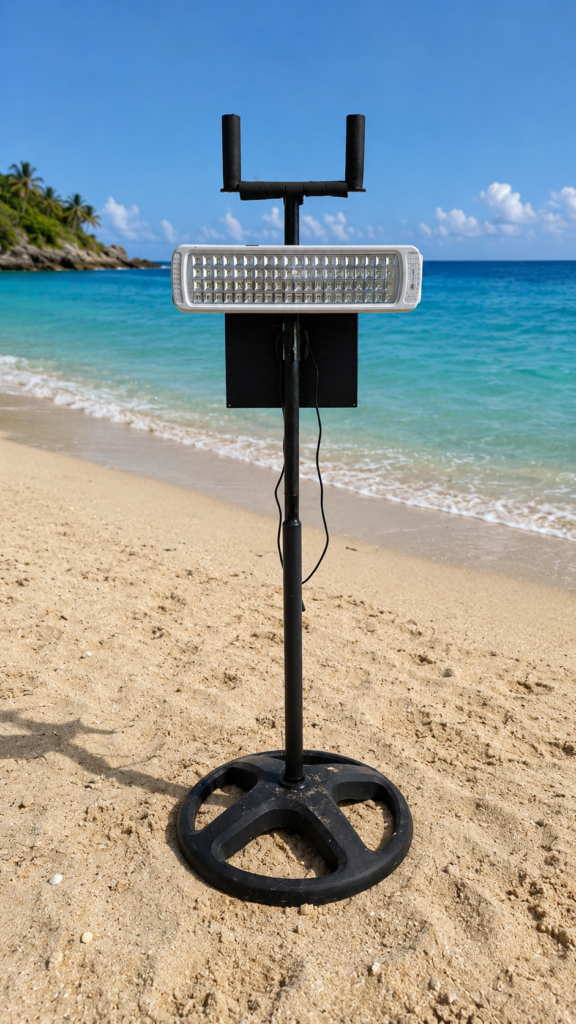
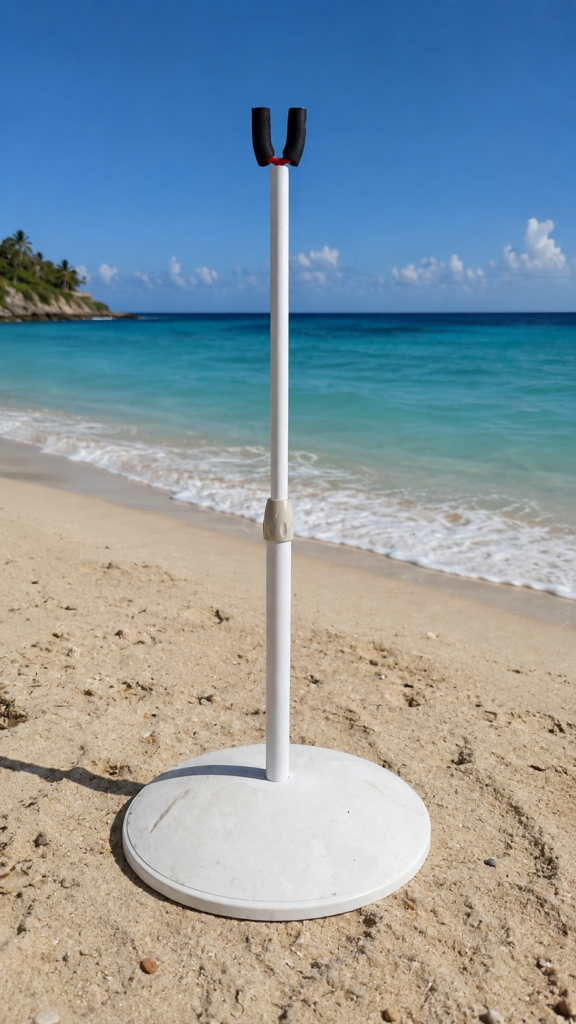
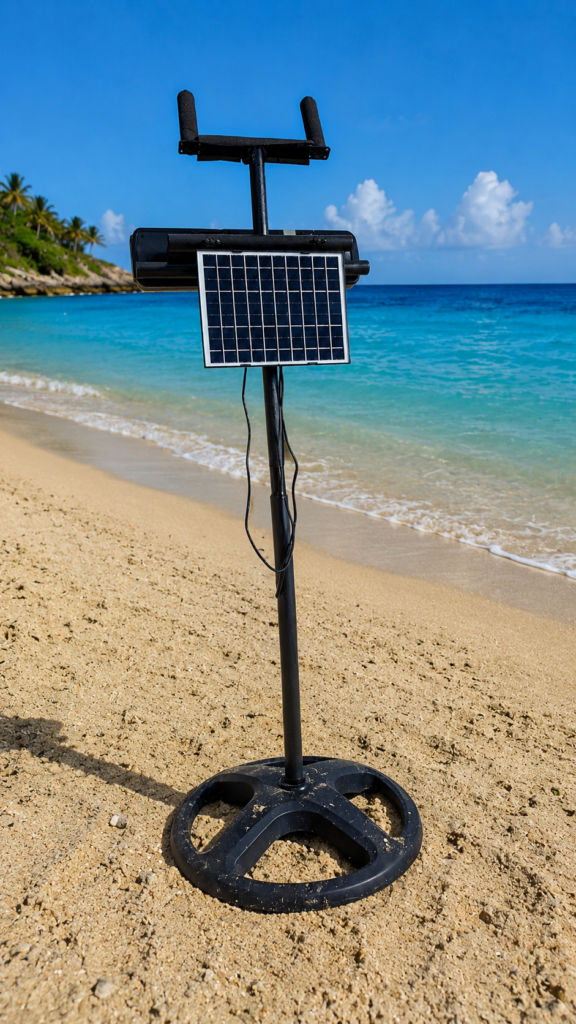
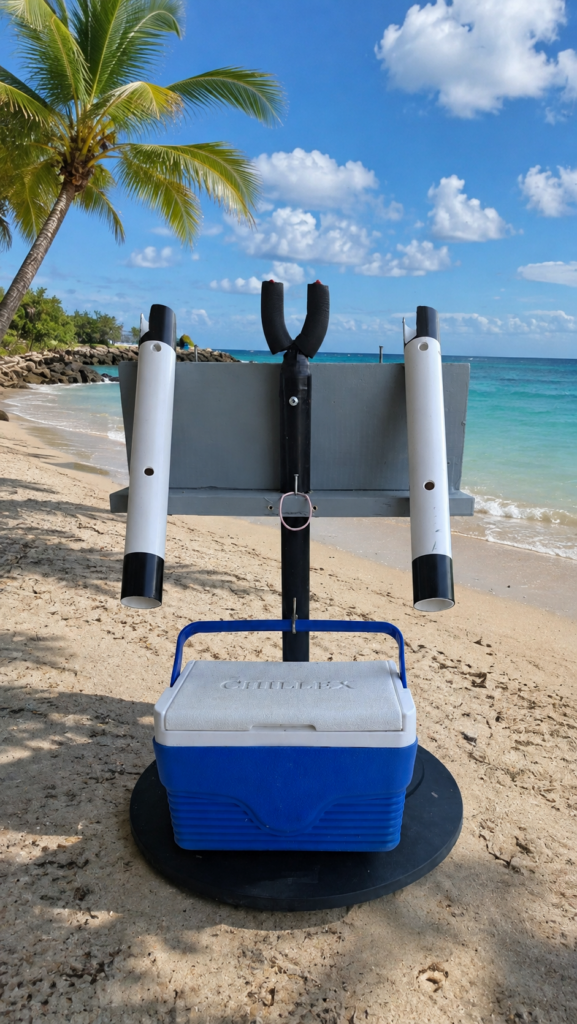
A broken standing fan does not necessarily belong in the trash. With a little creativity, the stand, base, brackets and other strong parts can be turned into a portable fishing rod holder for the beach, pier or shore.
The design can also be upgraded with an LED light for night fishing, a solar panel for charging your phone, and a bait box. The result is a useful fishing station made largely from recycled materials.
What You Need
The exact materials depend on the fan you have available, but a typical project can use:
- Broken standing fan or fan stand
- Heavy fan base
- PVC pipe or pieces of plastic tubing
- Metal or plastic brackets
- Screws, nuts and bolts
- Washers
- Drill and drill bits
- Screwdriver and wrench
- PVC glue or suitable adhesive
- Cable ties
- Waterproof electrical connectors
- Optional LED light
- Optional small solar panel
- Optional USB charging module
- Optional cooler or bait box
Step 1 – Prepare the Fan Base
The base of the fan is particularly useful because it is already designed to keep the fan upright.
Clean the base and remove unnecessary components. Check that it sits firmly on the ground.
For beach fishing, a wide and heavy base is preferable because it is less likely to tip over in wind or when a fish pulls on the rod.
If the original base is too light, additional weight can be added. For example, you can attach a larger plate underneath or use a removable weight.
Step 2 – Install the Main Upright
Use the original fan pole if it is strong enough. Otherwise, replace it with a length of metal tubing or strong PVC pipe.
Secure the pole vertically in the center of the fan base.
Drill through the appropriate sections and use bolts and large washers rather than relying only on glue. This makes the holder considerably stronger.
The upright should be tall enough to keep the fishing rod and reel comfortably above the sand.
Step 3 – Make the Rod Holders
The simplest version uses PVC tubes.
Cut two or more pieces of PVC pipe approximately 30–50 cm long, depending on the type of fishing rod you use.
Mount the tubes at an angle or vertically on a horizontal support.
The tubes should be large enough for the lower section of your fishing rods to slide in and out easily.
A useful arrangement
You could install:
- Two rod holders for normal beach fishing
- Three or four holders for a larger fishing station
- One central holder for a heavier rod
Make sure the tubes do not interfere with the fishing reels.
Step 4 – Attach the Rod-Holder Bracket
Create a horizontal bracket near the top of the upright.
This can be made from:
- Aluminum angle
- Steel flat bar
- PVC
- A piece of strong plastic
- Recycled parts from the fan
Bolt the bracket securely to the upright.
Then attach your PVC rod holders to it.
Tip: Angle the Holders Slightly
Angling the rod tubes slightly outward makes it easier to place the rods in them and keeps the reels away from the main support.
For surf fishing, however, make sure the angle does not allow a rod to slide out accidentally.
Step 5 – Add a Bait Box
One of the most useful upgrades is a small bait box.
A plastic storage box, small cooler or purpose-built bait container can be attached to the lower part of the frame.
A cooler is particularly useful because it can provide:
- Bait storage
- Drinks storage
- A place for ice
- Storage for hooks and terminal tackle
The bait box should be mounted low on the frame. This keeps the center of gravity low and makes the entire fishing station more stable.
A removable bait box is even better because you can take it with you when you leave the fishing spot.
Step 6 – Add an LED Light for Night Fishing
A simple LED light can turn the rod holder into a useful night-fishing station.
Mount the LED above or behind the rod holders so that it illuminates:
- The fishing rods
- The reels
- The bait box
- The area where you are working
A low-voltage LED light is recommended.
You can power it from a small rechargeable battery or from the solar system described below.
Avoid bright light directly over the water
A downward-facing light is generally more practical because it illuminates your working area without unnecessarily shining directly into the water or into another angler’s eyes.
For a cleaner installation, run the wires along the frame and secure them with cable ties.
Use waterproof connectors and protect the connections from saltwater.
Step 7 – Add a Solar Panel
A small solar panel can make the fishing station even more useful.
Mount the panel on the upper section of the frame where it receives plenty of sunlight.
The solar panel can charge a USB power bank or suitable battery system, which can then be used to charge your phone.
A simple system can consist of:
Solar panel → charge controller → battery/power bank → USB output
Do not connect a solar panel directly to a phone.
For a beach environment, protect the electronics from:
- Saltwater
- Sand
- Rain
- Splashing water
- Direct contact with wet hands
A waterproof enclosure with a rubber-sealed USB outlet is a good solution.
Step 8 – Combine Everything
The finished fishing station can combine several functions:
Basic version
Fan base + upright + two PVC rod holders
Fishing station
Rod holders + bait box + tackle storage
Night-fishing version
Rod holders + bait box + LED light
Solar version
Rod holders + bait box + LED + solar phone charger
This makes the recycled fan stand much more than just a rod holder.
Make It Stable on the Beach
Sand presents a special problem because a lightweight stand can easily fall over.
Some useful solutions are:
1. Use the original heavy fan base
This is the simplest solution.
2. Add weight
A removable weight can be attached to the base.
3. Use sand as ballast
A container attached to the lower section can be filled with sand when you arrive.
4. Keep heavy equipment low
Put the bait box, battery and other heavy items near the bottom.
This is particularly important if you install a solar panel or large LED light at the top.
Protect It From Saltwater
Because this fishing station will be used near the sea, corrosion protection is important.
Whenever possible, use:
- Stainless-steel screws and bolts
- Plastic brackets
- PVC tubing
- Marine-grade cable ties
- Waterproof electrical connectors
After fishing, rinse the equipment with fresh water and allow it to dry.
Pay particular attention to bolts, brackets and electrical connections.
Final Result
With a little work, an old broken fan can become a practical recycled beach fishing station.
Instead of throwing away the fan, you can reuse its heavy base and strong support structure and build a system that holds your fishing rods while also providing space for bait and tackle.
With a few additional components, the same design can become a much more advanced setup with:
🎣 Multiple fishing rod holders
💡 LED lighting for night fishing
☀️ Solar charging for your phone
🧊 Bait box or small cooler
🔋 Rechargeable battery
🧰 Storage for hooks, lures and terminal tackle
The best part is that the design can be adapted to whatever broken fan, PVC pipe and fishing equipment you already have.
Always test the completed holder on land before putting your fishing rods in it, and make sure the base remains stable when a rod is loaded or pulled sideways.
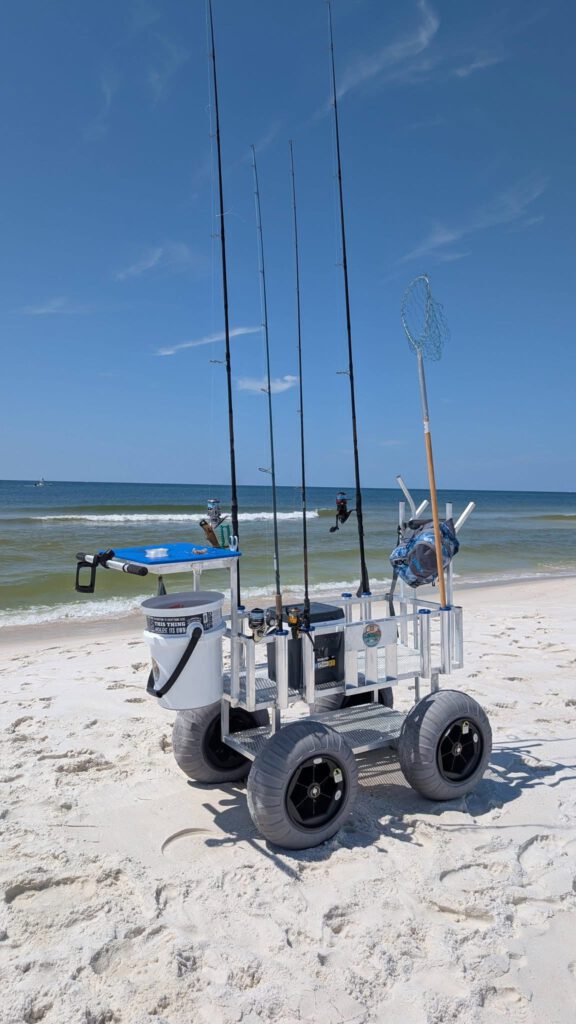
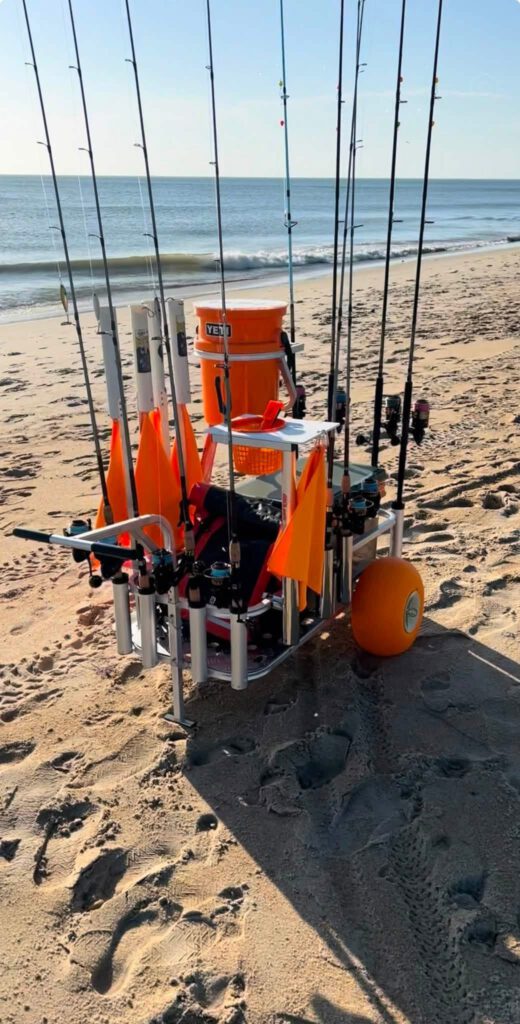
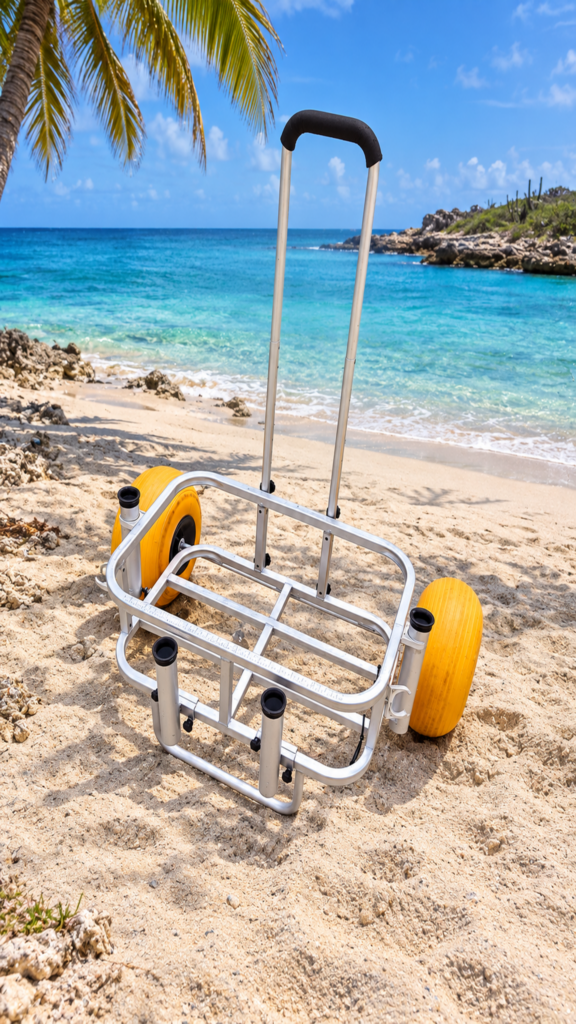
Custom Surf Carts & Parts
How to Throw a Cast Net: A Beginner’s Step-by-Step Guide
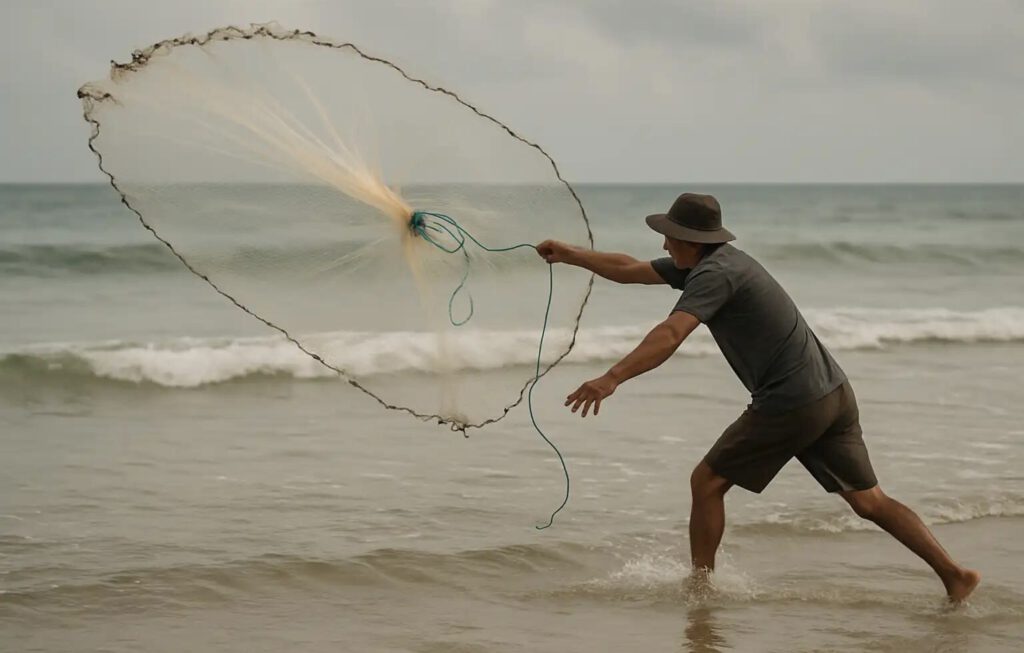
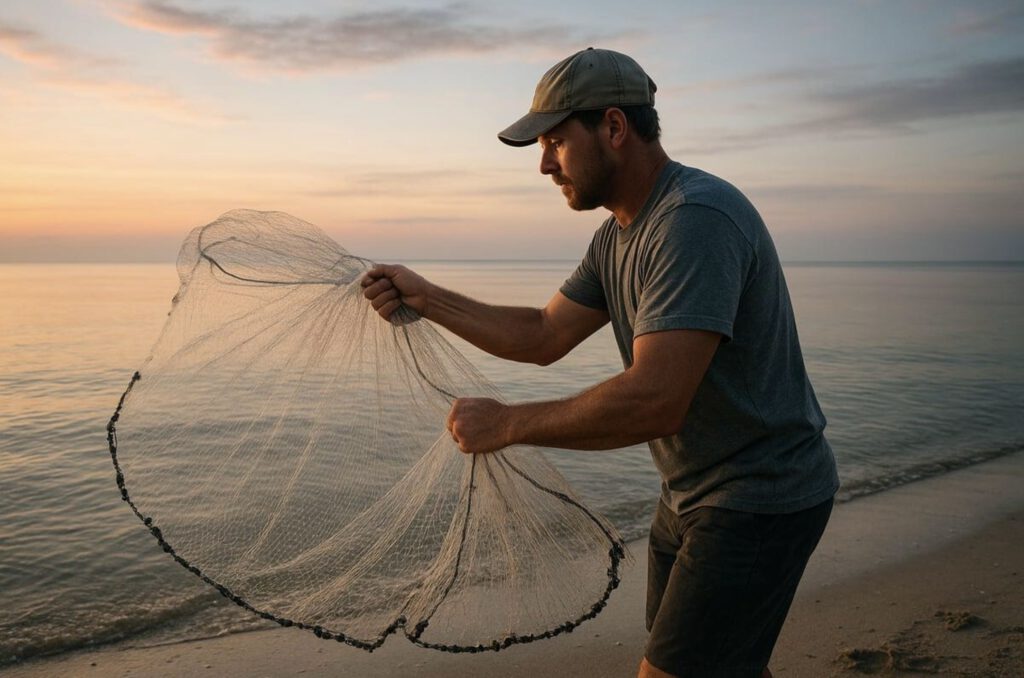
Throwing a cast net looks easy when an experienced angler does it. The net seems to fly through the air, open into a perfect circle, and land softly on the water. For a beginner, however, getting that same “pancake” spread takes a little practice.
The good news is that you don’t need to be particularly strong. Good preparation, correct loading, body rotation, and timing are more important than simply throwing hard.
What Is a Cast Net?
A cast net is a circular fishing net with weights around its outside edge. It is commonly used to catch small baitfish such as mullet, sardines, pilchards, shad and other forage fish.
When thrown correctly, the net spreads out in the air. The weighted edge then sinks around the fish. When you pull the handline, the weighted edge comes together underneath the catch, creating a pocket that keeps the bait inside.
Know the Parts of Your Cast Net
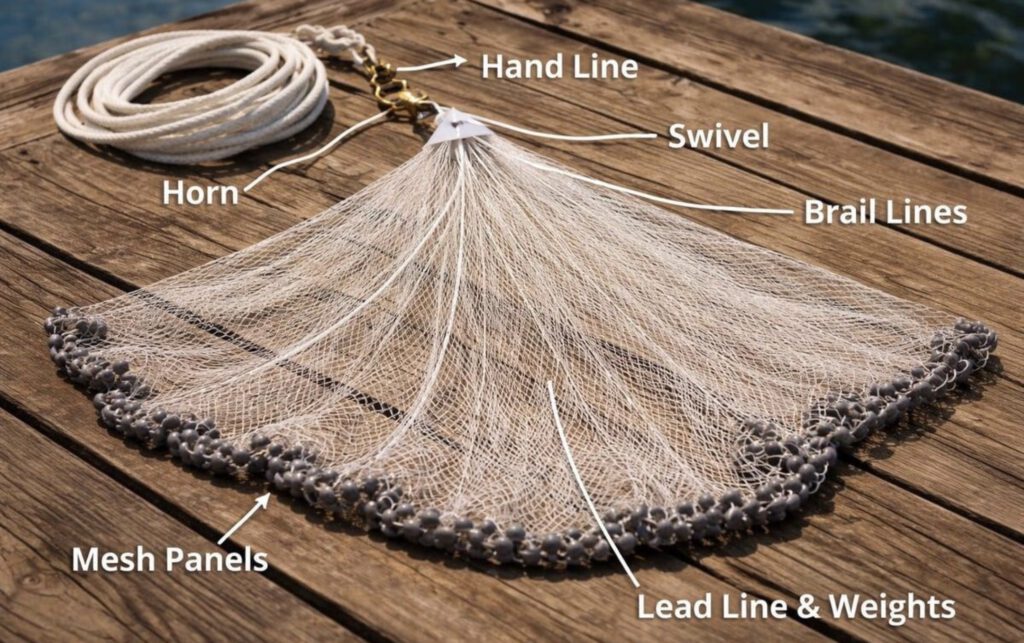
Before learning to throw, it helps to understand the basic parts.
1. Handline
The rope attached to the center of the net. You keep hold of this line while throwing and use it to retrieve the net.
2. Horn
The central top portion of the net where the lines come together.
3. Mesh
The netting that surrounds the baitfish when the net lands.
4. Brail lines
Lines running from the center toward the weighted edge. They help close the net when you retrieve it.
5. Lead line and weights
The weighted outside edge of the net. These weights make the net spread and sink quickly.
Step 1 — Choose a Manageable Net
If you’re learning for the first time, don’t start with the biggest net you can find.
A 4–6 ft radius net is generally easier to handle while learning. Larger nets provide more coverage but are heavier and require better loading and timing.
Remember that a net advertised as a 6-foot net can have a spread roughly 12 feet across when fully opened, depending on how the manufacturer measures it.
Step 2 — Check the Net for Tangles
Hold the net by the horn and let it hang down.
Look carefully at the mesh and weighted edge.
Make sure:
- The mesh isn’t twisted.
- The lead line isn’t tangled.
- The brail lines are separated.
- Nothing is caught in the weights.
- The handline is free to run.
A small tangle can prevent the entire net from opening properly.
Step 3 — Secure the Handline
For a right-handed throw, place the handline loop around your left wrist and coil the excess line neatly.
The coils should be loose enough to come off smoothly.
Important: Don’t wrap the line tightly around your hand or fingers. You want the line to release freely if the net becomes snagged.
Step 4 — Gather the Net
Hold the horn and allow the net to hang.
Use your free hand to gather part of the net and bring the weighted edge into a controlled position.
The goal is to distribute the net evenly rather than having a large, heavy bundle hanging on one side.
For a beginner, it is usually easier to use a simple two-section or dry-load technique rather than trying an advanced throwing method.
Step 5 — Get Into the Correct Position
Stand with your feet approximately shoulder-width apart.
Turn your body slightly sideways so that your non-throwing shoulder points toward the target.
Keep your knees slightly bent and maintain solid footing.
Don’t try to throw the net like a baseball. The movement should come from your hips, shoulders and arms working together.
Step 6 — Make the Throw
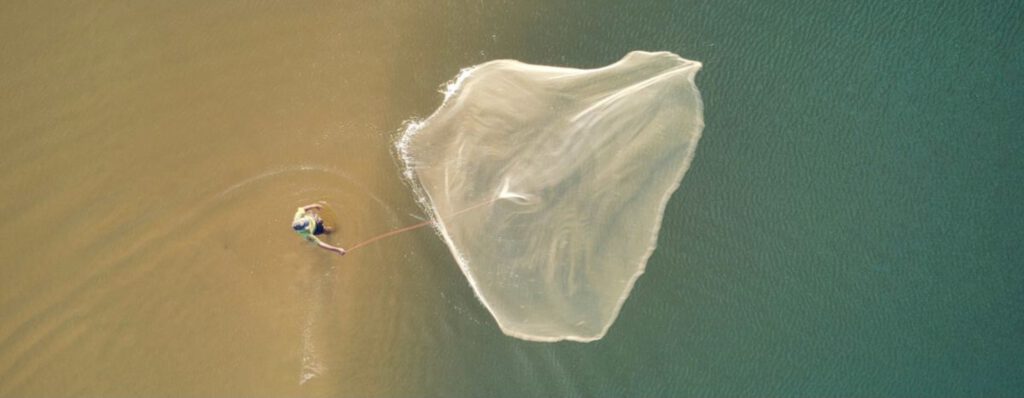
This is the part that takes practice.
Begin rotating your upper body toward the target. At the same time, swing the loaded net outward in a smooth circular motion.
Think about throwing a large, flexible blanket rather than throwing a heavy object.
Release the net upward and outward, allowing the weighted edge to pull the net open.
A good cast should look something like a flying pancake: wide, flat and circular.
The important thing is timing, not brute strength. A controlled rotation and clean release will generally produce a better spread than trying to throw as hard as possible.
Step 7 — Let the Net Sink
Once the net hits the water, don’t immediately pull it back.
Give the weighted edge time to sink around the bait.
In shallow water this might take only a few seconds. Deeper water requires more time.
Watch the handline and feel for the weight of the net settling.
Step 8 — Retrieve the Net
Once the net has sunk, pull the handline steadily.
As you pull, the brail lines draw the weighted edge inward, closing the bottom of the net.
Continue pulling until the net comes back to you.
Don’t yank aggressively. A smooth, steady retrieval makes handling the net easier and helps prevent unnecessary tangles.
The Most Common Beginner Problems
❌ The net lands in a pile
Possible cause: The net wasn’t loaded correctly or the release was too early.
Solution: Slow down and concentrate on separating the sections of net before the throw.
❌ The net opens only halfway
Possible cause: Uneven loading or insufficient rotation.
Solution: Check that the lead line is distributed evenly and use your hips and shoulders rather than only your arm.
❌ The net goes too far
Possible cause: Too much throwing power.
Solution: Reduce the force and concentrate on opening the net rather than distance.
❌ The net doesn’t spread at all
Possible cause: A tangled lead line or mesh.
Solution: Stop and completely untangle the net before trying again.
❌ The net opens like a kidney instead of a circle
This is usually a sign that the net was released unevenly or that the weight distribution wasn’t balanced.
A Simple Practice Method
You don’t have to learn on the water.
Find a large, open area where there are no people, animals, vehicles, branches or other objects that could catch the net.
Practice the complete sequence:
Check → Coil → Gather → Load → Rotate → Release → Spread
Start with a small net and concentrate on getting it to open properly. Once you can consistently produce a good circular spread, you can gradually work toward larger nets.
A U.S. Fish & Wildlife/NOAA instructional leaflet likewise emphasizes that smaller cast nets are easier for beginners and that mastering the technique primarily takes practice and patience.
Cast Net Safety
Cast nets have weighted edges and can become dangerous if they wrap around your body, feet or equipment.
Always:
- Check your surroundings before throwing.
- Keep other people clear of the throwing area.
- Maintain stable footing.
- Keep the handline organized.
- Don’t throw around power lines or other overhead hazards.
- Be especially careful on wet boat decks, rocks and docks.
- Check local fishing regulations before using a cast net.
Avoid putting the weighted lead line in your teeth. Some traditional techniques use the mouth to hold part of the lead line, but a hands-only technique is available and avoids putting a weighted fishing line in your mouth.
The Secret to a Good Cast
The biggest lesson for beginners is simple:
Don’t try to throw the net harder. Try to throw it smoother.
A successful cast comes from even loading, a controlled body rotation, good timing and a clean release. Once those movements become automatic, the net will begin opening into the wide circular shape you’re looking for.
For a visual demonstration, this beginner video by John Frederick shows a hands-only throwing method and explains the process from choosing a net through retrieving it:
Advantages and Disadvantages of Regular Snorkel Equipment vs. Full-Face Snorkel Masks
Introduction
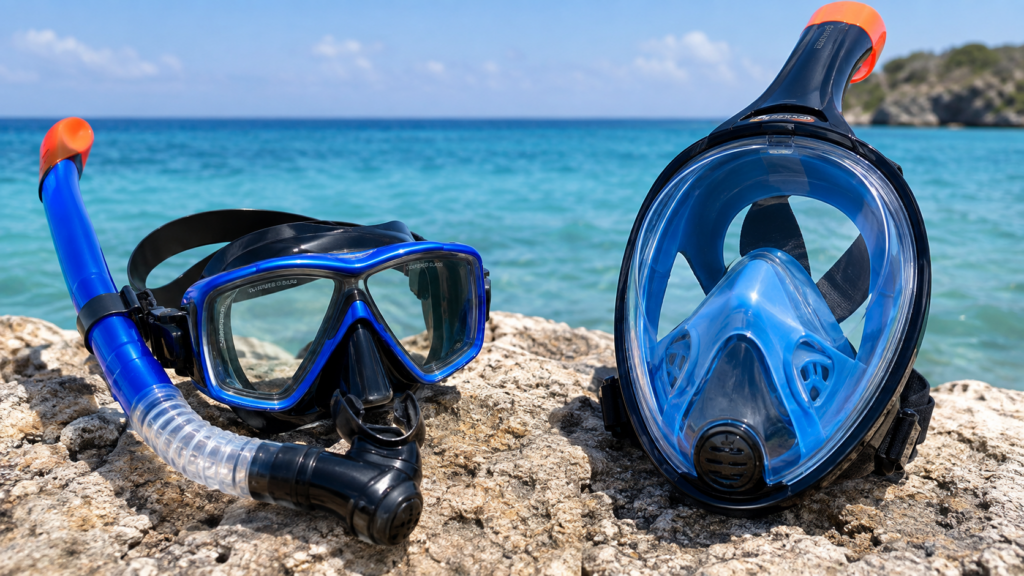
Snorkeling is a popular recreational activity that allows people to observe marine life while swimming at the surface of the water. Two common types of snorkeling equipment are the traditional snorkel set, consisting of a separate diving mask and snorkel, and the full-face snorkel mask, which covers the entire face.
Both systems have advantages and disadvantages. The best choice depends on the user’s experience, comfort, intended use, and the conditions in which the equipment will be used.
1. Regular Snorkel Set
A traditional snorkel set normally consists of a mask covering the eyes and nose, a separate snorkel for breathing, and often fins.
Advantages
Better control of breathing
With a traditional snorkel, the user breathes through a mouthpiece. This is a familiar system for recreational snorkelers and divers and allows the user to control breathing directly through the snorkel.
Suitable for different activities
Traditional masks can be used for snorkeling as well as other water activities and are generally more versatile. Many models can also be used for diving, depending on their design and the user’s training.
Good underwater visibility
A traditional mask can provide a wide and clear field of view, particularly when it has a large single lens or low-volume design.
Easy to clear and remove
If water enters the mask or snorkel, the user can clear the equipment using established snorkeling techniques. The mask can also be removed quickly.
Generally compact
A traditional mask and snorkel are relatively easy to pack and transport separately.
More established for diving
Traditional snorkeling equipment is the standard choice for recreational scuba diving and freediving. It is therefore more appropriate for people who may want to progress to these activities.
Disadvantages
Requires breathing through the mouth
Some people find the mouthpiece uncomfortable, especially during long snorkeling sessions.
Can cause jaw or mouth fatigue
Holding the snorkel mouthpiece between the teeth for an extended period can become uncomfortable.
More difficult for beginners
A first-time snorkeler may need some practice to become comfortable breathing through a mouthpiece while swimming.
Water can enter the snorkel
Waves or incorrect positioning can cause water to enter the snorkel. The user must know how to clear it.
Possible mask fogging
Traditional masks can fog, particularly if they are not prepared properly or if there is a significant temperature difference between the face and water.
2. Full-Face Snorkel Mask
A full-face snorkel mask covers the eyes, nose, and mouth. It normally has an integrated breathing tube and allows the user to breathe through the nose or mouth.
Advantages
Natural breathing
One of the biggest advantages is that the user can breathe normally through the nose or mouth. This can feel more natural and comfortable than using a mouthpiece.
Comfortable for many recreational users
People who dislike holding a mouthpiece in their mouth may find a full-face mask more comfortable.
Large field of vision
Many full-face masks are designed with a wide viewing area, allowing the user to see a large portion of the underwater environment.
No mouthpiece
The absence of a separate mouthpiece eliminates jaw fatigue and can make snorkeling more relaxing.
Easy to use
For surface snorkeling, the design can be relatively intuitive because the user simply puts the mask on and breathes normally.
Good protection from splashing water
The mask covers most of the face, which can provide a greater feeling of protection from splashing water and wind.
Disadvantages
Not suitable for scuba diving
A full-face recreational snorkel mask is not a replacement for a scuba mask and regulator. It should not be used for scuba diving unless it is specifically designed and certified for that purpose and the user has appropriate training.
More difficult to remove quickly
Because the mask covers the entire face, removing it in an emergency can be less straightforward than removing a conventional mask.
Potential breathing and CO₂ concerns
Full-face snorkel masks use an internal breathing pathway. Poorly designed, damaged, incorrectly fitted, or improperly used masks can create breathing problems or inadequate carbon-dioxide removal. This makes correct design, fit, maintenance, and use particularly important.
Can be more difficult to use in rough conditions
Although the integrated snorkel may help keep water out under normal conditions, waves can still create problems. Full-face masks are primarily intended for surface snorkeling in suitable conditions.
More difficult to communicate
The mask makes normal verbal communication difficult while in the water.
Bulkier equipment
A full-face mask is generally larger than a conventional mask and snorkel combination and can take up more space when travelling.
Fit is very important
A poor seal around the face can allow water to enter and can also make the mask uncomfortable. Facial hair, incorrect sizing, or an unsuitable face shape can affect the seal.
3. Direct Comparison
| Feature | Regular Snorkel Set | Full-Face Snorkel Mask |
| Breathing | Through mouthpiece | Through nose or mouth |
| Comfort | Good, but mouthpiece may cause fatigue | Often very comfortable |
| Ease of use | Requires some practice | Generally intuitive for surface snorkeling |
| Field of view | Very good | Often very wide |
| Clearing water | Established mask/snorkel clearing techniques | More complicated depending on design |
| Scuba diving | Suitable when combined with proper diving equipment | Not suitable for recreational scuba |
| Size | Relatively compact | More bulky |
| Communication | Difficult | More difficult |
| Emergency removal | Relatively straightforward | Can be less straightforward |
| Rough-water use | Depends on snorkel design and conditions | Requires particular caution |
| Suitability for beginners | Good after basic instruction | Convenient for surface snorkeling, but still requires safety knowledge |
| Versatility | High | Mainly intended for surface snorkeling |
4. Safety Considerations
Regardless of the equipment chosen, snorkeling should be treated as a water activity with potential risks.
Users should ensure that equipment fits correctly and is in good condition before entering the water. Snorkeling should preferably take place in calm conditions, and users should avoid going beyond their swimming ability.
A full-face mask should not be assumed to be safer simply because it allows natural breathing. The quality and design of the mask are important. Users should follow the manufacturer’s instructions and avoid using equipment that is damaged, poorly fitted, or difficult to breathe through.
Traditional snorkeling equipment also requires appropriate knowledge. Users should know how to clear a flooded mask and snorkel and should be comfortable swimming while wearing the equipment.
Conclusion
Both traditional snorkel sets and full-face snorkel masks can be effective for recreational surface snorkeling.
A regular mask and snorkel offer greater versatility, established clearing techniques, and better compatibility with other diving activities. They are particularly suitable for people who may want to progress from snorkeling to freediving or scuba diving.
A full-face snorkel mask can provide greater comfort for people who dislike mouthpieces and can make relaxed surface snorkeling easier. However, it is more specialized, and the quality, fit, breathing system, and correct use are particularly important.
For general recreational snorkeling in calm water, a good-quality full-face mask can be a convenient option for some users. For greater versatility, diving activities, training, or more demanding conditions, a traditional mask and snorkel are generally the better choice.
Ultimately, the equipment should be selected based on the user’s swimming ability, experience, comfort, the environmental conditions, and the intended activity—not simply on which design appears easier to use.
Fishing with Planers
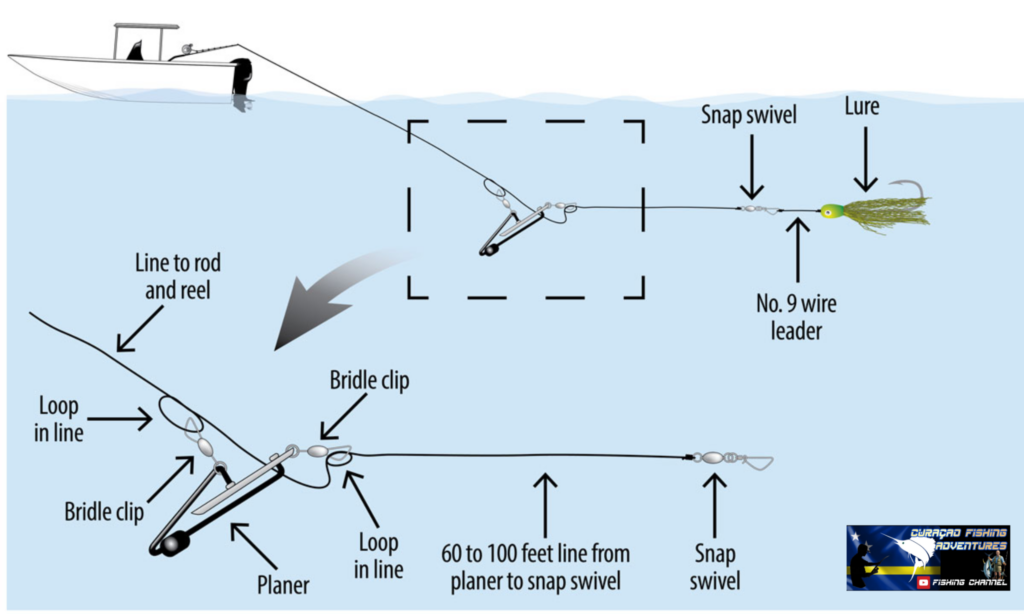
Fishing with a diving planer is a trolling method used to get baits down deep without heavy lead or a downrigger, utilizing sizes like No. 2, No. 3, or No. 4 to dive at a 45-degree angle and automatically trip when a fish strikes.
Setup and Sizes
- No. 2 Planer: Dives 15 to 20 feet; uses 30- to 50-pound line.
- No. 3 Planer: Dives 25 to 35 feet; uses 50- to 80-pound line.
- No. 4 Planer: Dives 35 to 50 feet; uses 80- to 130-pound line.
- Trolling Speed: Maintain 4 to 6 miles per hour (1,000 to 1,500 rpm).
Deployment and Strike Detection
- Planer First: Let out the planer 75 to 150 feet behind the boat until it digs in with a steady bend on the rod.
- Attach Bait: Send your lure or bait back 50 to 200 feet behind the planer using a release clip or rubber band.
- The Strike: Watch for the rod tip to pop straight when the planer trips from a fish hit, then reel in quickly.
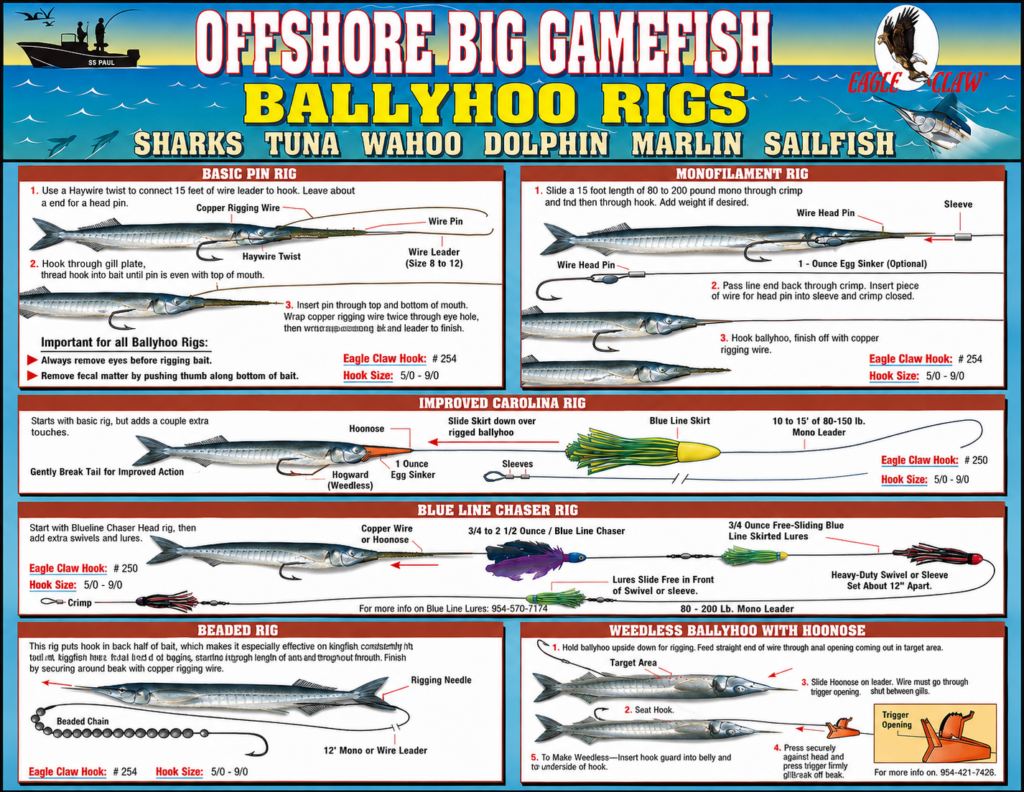
Easy Bottom Rigs
Swordfish Rig Setup
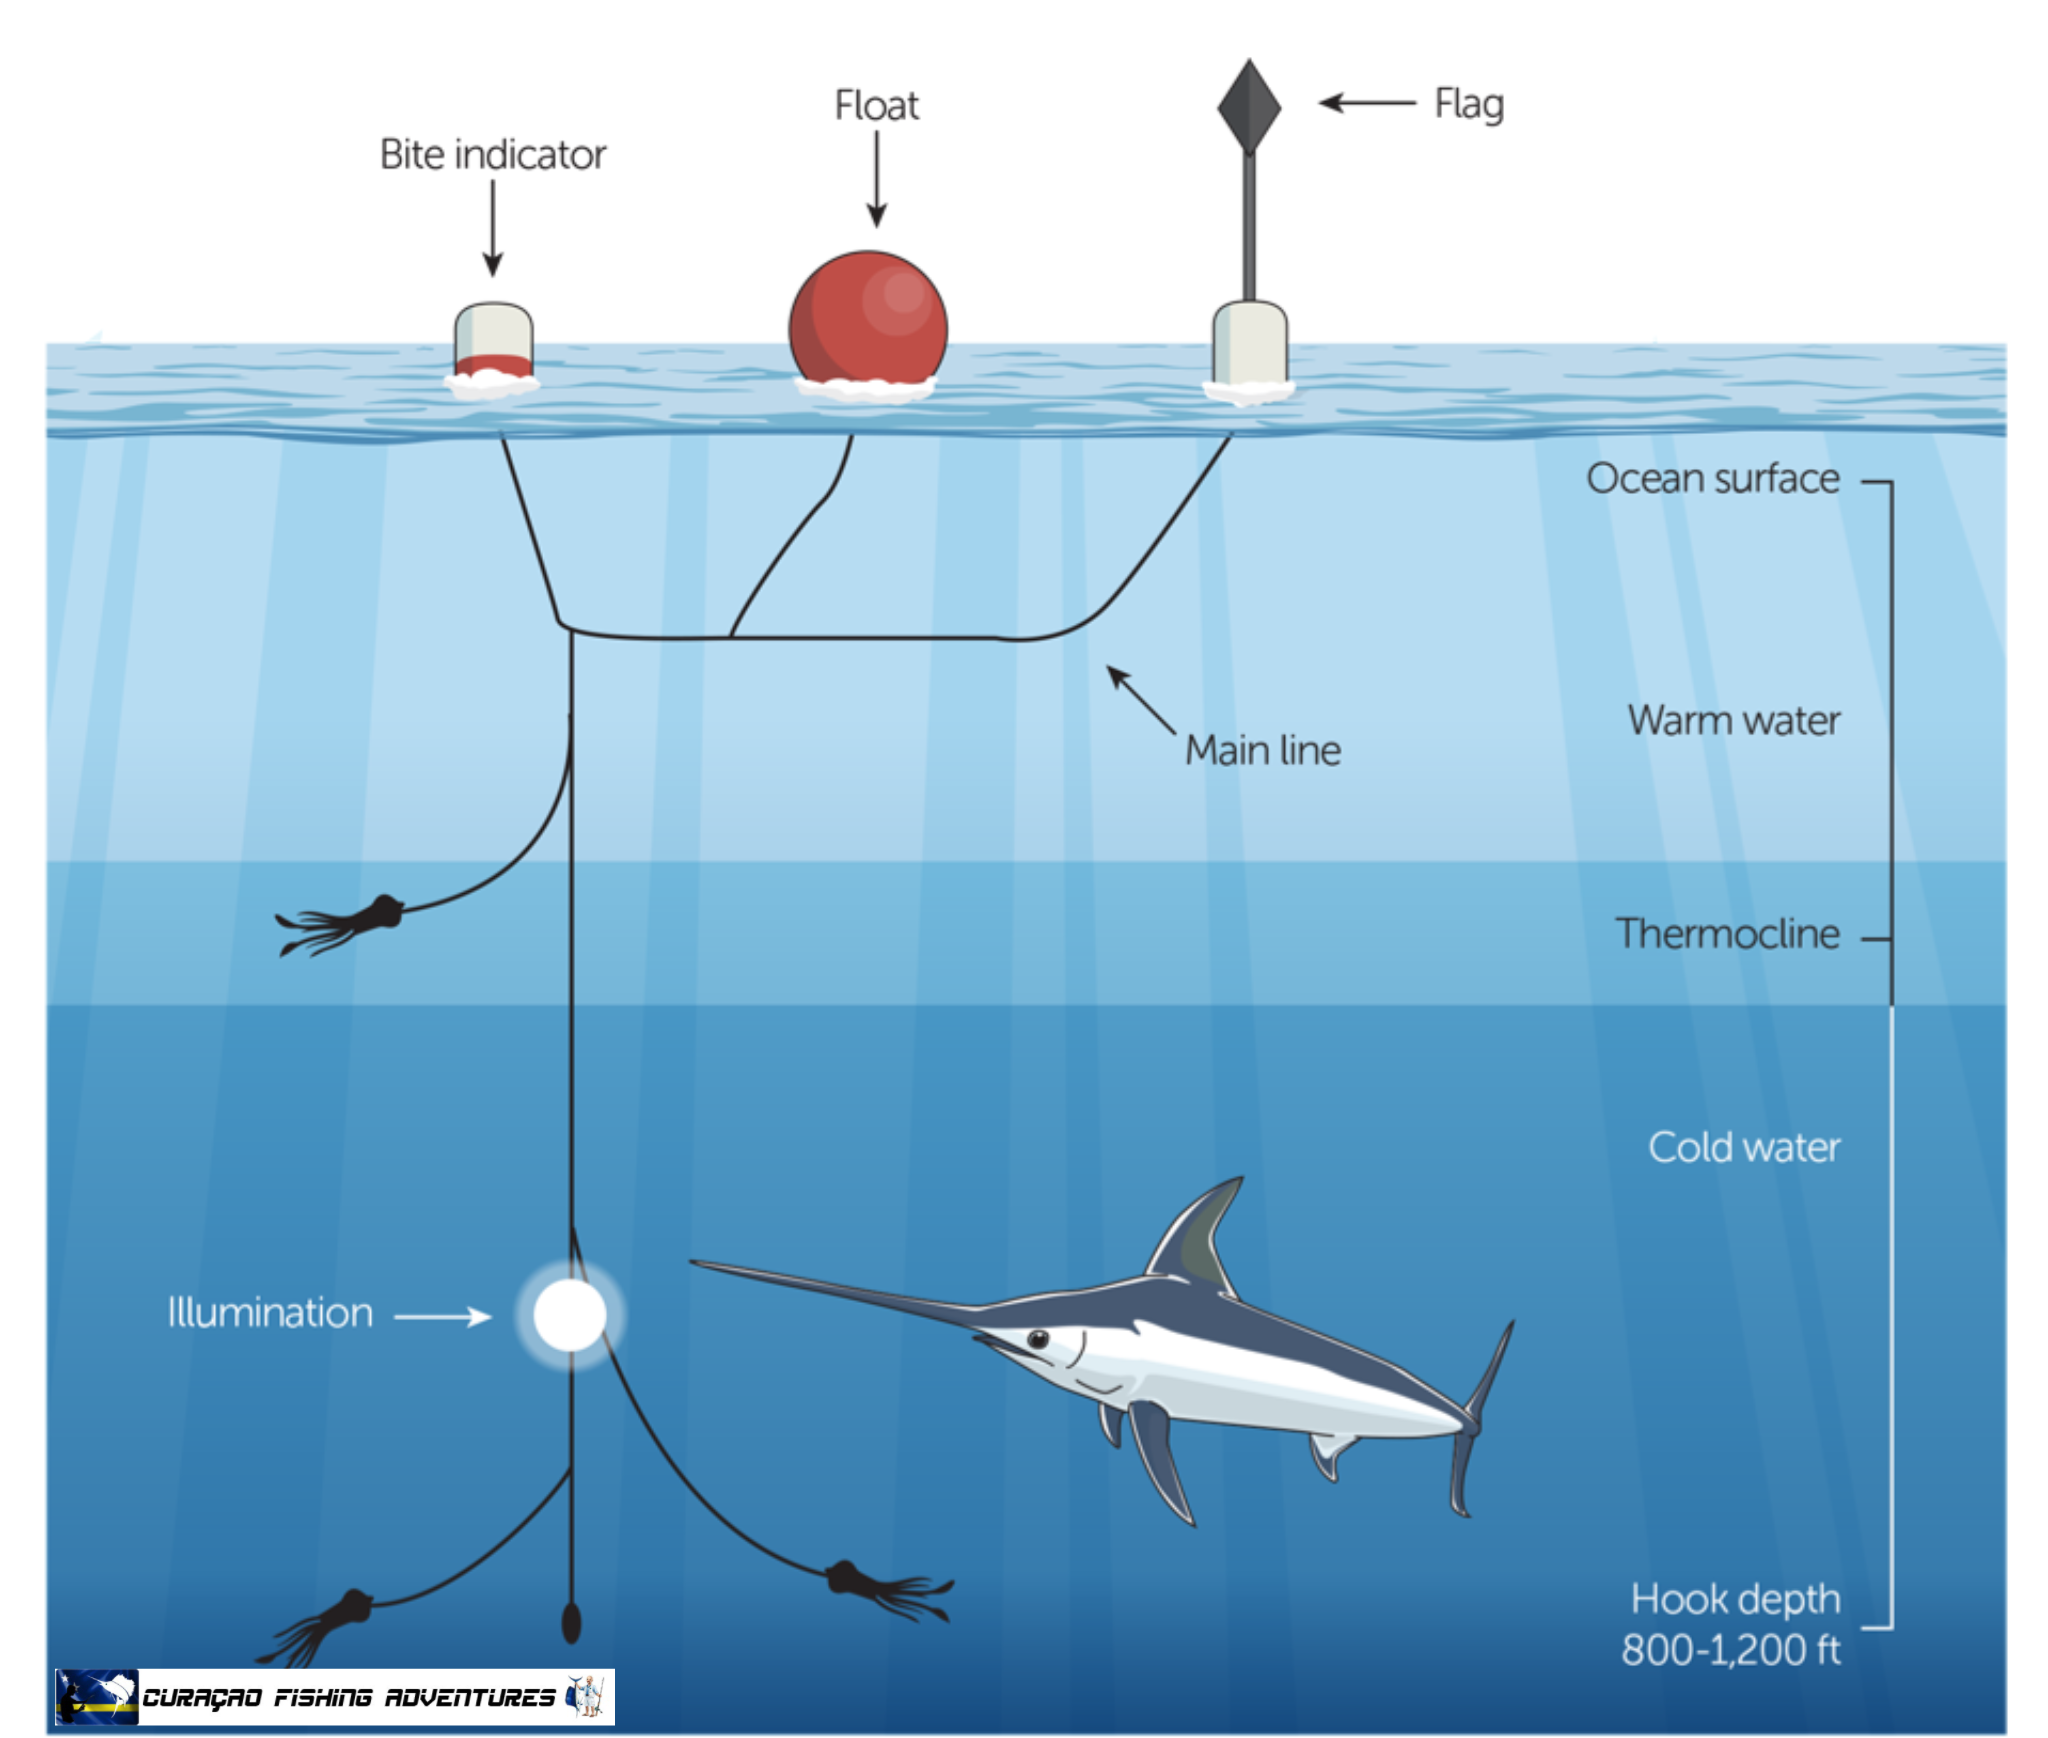
A standard daytime deep-drop swordfish rig setup consists of an 80 to 130-class bent-butt rod, a heavy-duty electric or two-speed overhead reel, 100 to 150 feet of 200 to 250-pound monofilament leader, and a 7 to 12-pound lead weight attached via a breakaway clip.
Main Line and Leader Components
- Main Line: Spooled with 80 to 100-pound braided line marked at regular color-coded intervals.
- Wind-On Leader: 100 to 150 feet of 120 to 200-pound test monofilament.
- Bite Leader: A 5-foot section of heavy 200 to 300-pound test monofilament or fluorocarbon connected via a heavy-duty 600-pound barrel swivel.
- Hook: Size 10/0 to 12/0 J-hook or strong circle hook crimped securely to the bite leader.
Weight and Dropper Setup
- Lead Weight: A 7 to 12-pound lead stick or sash weight.
- Breakaway Connection: Attach the weight to a 5-foot dropper line secured to a loop of wax rigging floss tied onto the main leader about 100 feet above the bait. This allows the weight to break away or detach easily when fighting a fish.
Bait Options
- Preferred Baits: Whole squids, bonito bellies, or durable sewn strip baits like mahi-mahi and tuna belly flaps.
- Presentation: Sew the bait tightly using rigging floss and a needle so it does not spin or wash out while drifting in deep water.
Jackery HomePower 3000


Essentials:
Keeps essentials running for 1-2 days with 3072Wh capacity, powering your fridge, Wi-Fi, fans, and lights through extended outages.
10+ Years of Use with ChargeShield™ 2.0:
Built to last a decade and more, with ChargeShield™ 2.0 battery technology and a 5-year warranty for long-term peace of mind.
World’s Lightest and Smallest 3kWh Design:
The world’s lightest and smallest 3kWh power station, thanks to advanced cell-to-body (CTB) design, easier to move and store without sacrificing power.
3600W Runs Multiple Devices at Once:
Delivers 3600W continouous output (up to 7200W surge) to handle refrigeration, lighting, router, and small appliances without circuit overloads.
Always Ready with ZeroDrain™:
Store it worry free: ZeroDrain™ technology retains ~95% charge after 12 months, so your backup power is ready whenever you need it.
Home-Circuit Ready:
Pair with a manual transfer switch to store up to six (6) essential home circuits when the grid goes down.
Seasonal Fishing Calendar

You can catch anything from Tarpon, Sharks, Barracuda, Snappers, and Groupers to Mahi Mahi, Wahoo, Tuna, Marlin, and Sailfish. Absolutely! Deep sea fishing is the name of the game in Curaçao and you’re in for a treat! Both Aruba and Curaçao are excellent deep sea fishing destinations. Curaçao sits outside the main hurricane belt, offering consistent fishing year-round.
Species, Peak Season and Key Characteristics
1. Mahi-Mahi; found near floating debris and weed lines.
2. Wahoo; famous for lightning-fast runs.
3. Yellowfin Tuna; often targeted with live bait.
4. Blue Marlin; best chance for a heavyweight catch.
5. Barracuda, Year-round Aggressive ambush predators; safe to eat in Curaçao.
Core Fishing Regulations
Shore Fishing: No license is required for recreational shore fishing.
Boat Fishing: If you book through a licensed charter operator, your permit is typically included. Independent boaters with engines over 9.9 hp require a local boating license.
Conservation: Spearfishing is strictly forbidden. While there are no official catch limits for many species, it is local etiquette to catch and release marlin, sailfish, and smaller juveniles.


C-MAP® App
With the C-MAP App always have the latest most detailed chart data to hand, on your phone, tablet or PC; personalise your experience with the chart layers that you need – view your charts, your way. Planning routes has never been easier, save your favourite destinations or fishing spots in the App, check the weather, and when it’s time to go, create your route or let Autorouting do it for you.

Deeper Smart Sonar CHIRP+ 4
AI-powered fish detection, personal bottom hardness, and weed maps in 2D & 3D, along with 3-frequency CHIRP technology. The most advanced castable sonar ever made.


FAQ: Difference between bottomfishing and Deep Dropping
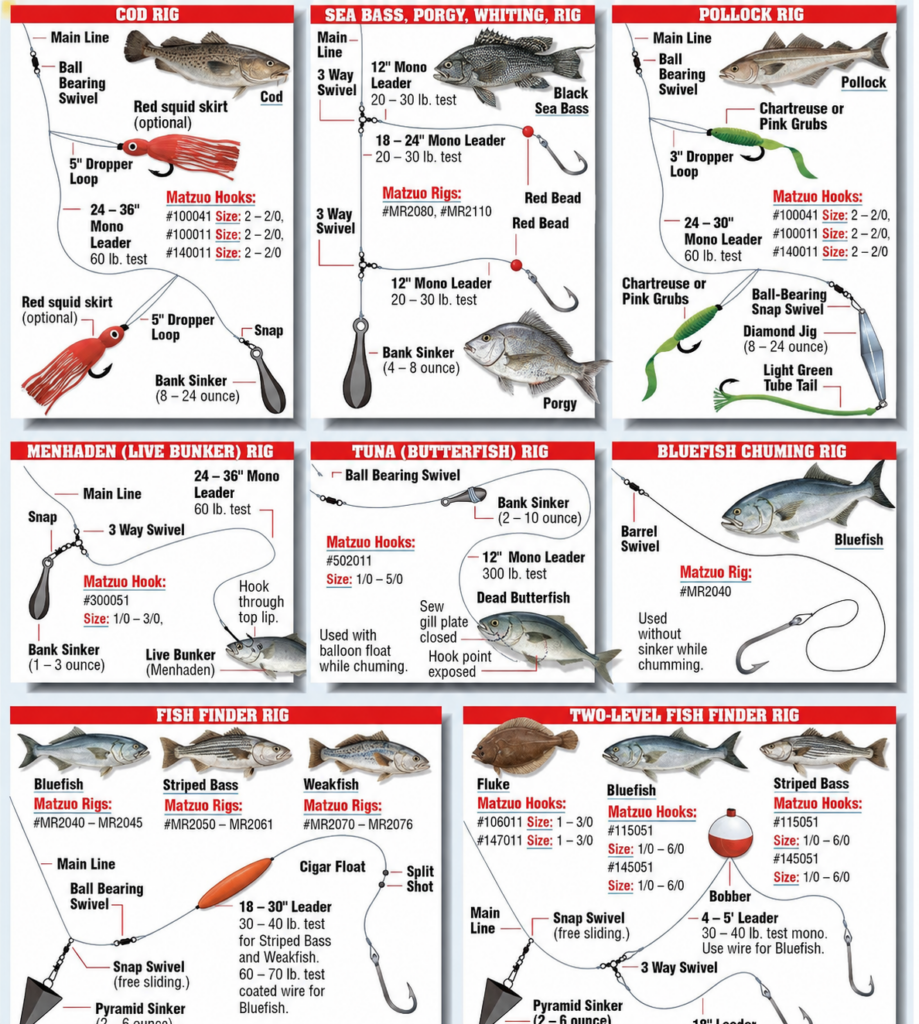
Bottom fishing is a simple, effective angling technique where a weighted baited hook is dropped to the bottom of a lake or ocean, targeting fish that feed near the seabed, like catfish, grouper, or snapper, by presenting bait right where they live, requiring patience and simple gear like a rod, reel, sinker, hook, and bait, ideal for catching a variety of species in both fresh and saltwater.
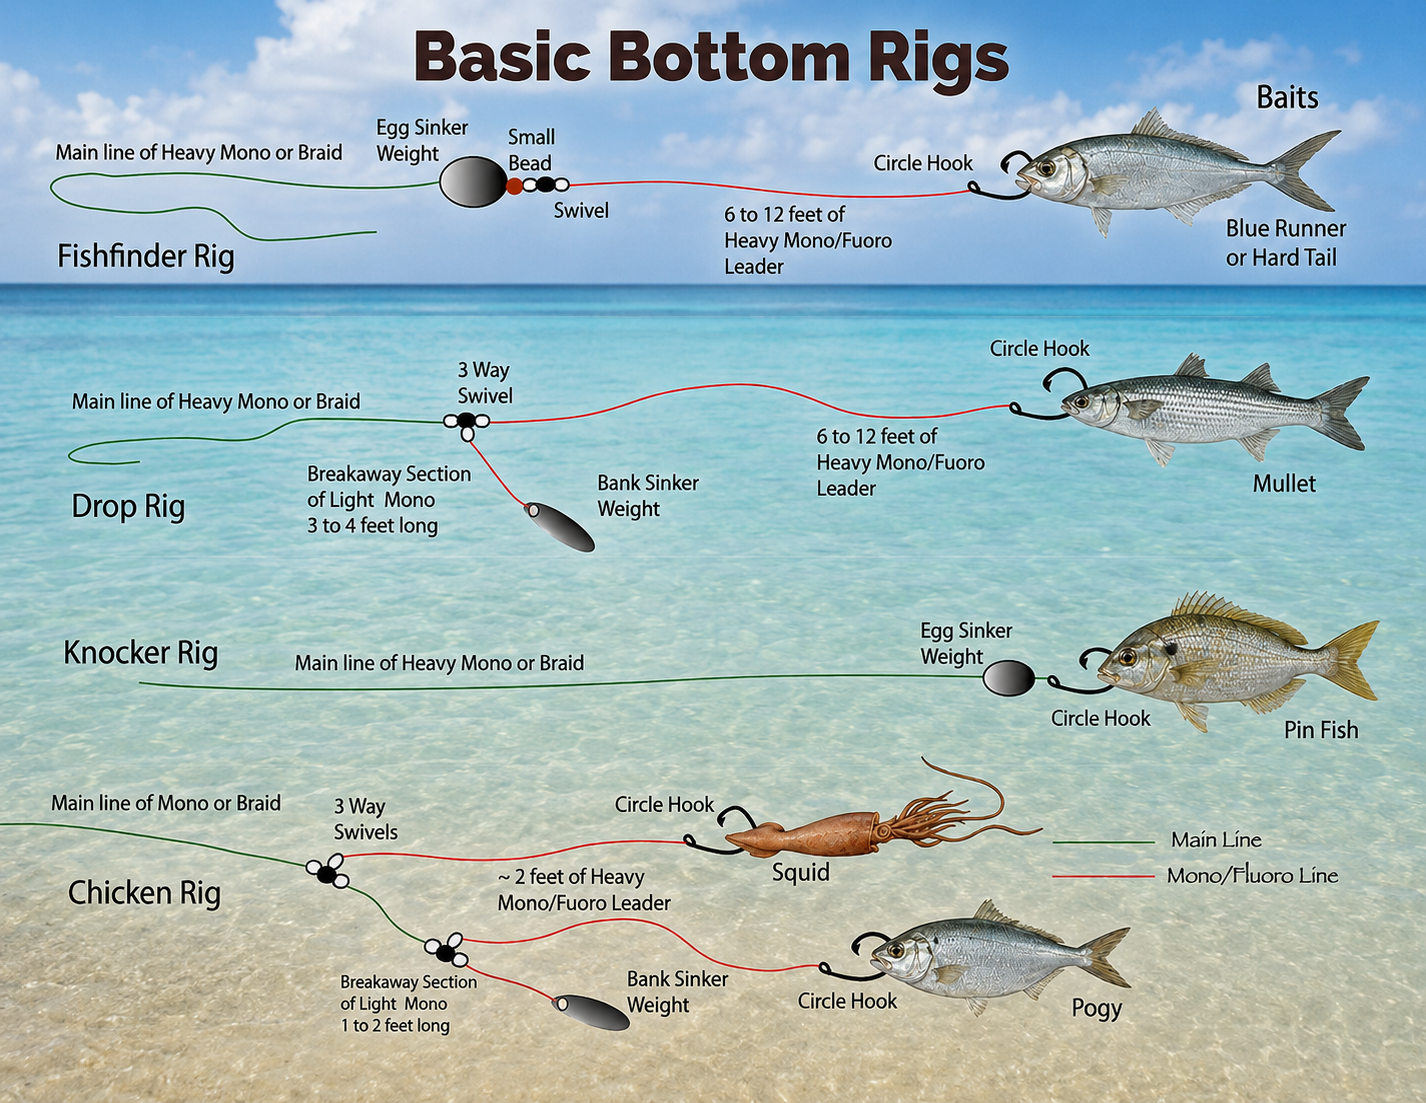
Gear: Uses a sinker (weight) to take bait (like squid, worms, or cut fish) to the bottom, often with a rig featuring one or more hooks.
Technique: Cast out and let the weight sink, keeping the line tight enough to feel bites but allowing the bait to sit naturally on or just above the seabed.
Key elements:
– Weight: Gets your bait down deep, overcoming current.
– Bait: Natural baits (squid, cut fish) or lures attract fish that forage on the bottom.
– Rigs: Various setups, like dropper loops or three-way swivels, can hold multiple hooks or keep the weight separate from the bait.
– Target species & locations; Saltwater: Snapper, grouper, cod.
– Locations: Deep lakes, rocky areas, wrecks, and drop-offs in both fresh and saltwater.

Deep dropping is a specialized form of bottom fishing that targets fish in extreme depths (100 to over 1000 meters) using heavy weights, durable gear (braid line, strong rods/reels, electric winches), and specific techniques to reach and present bait to deep-sea species like grouper, tilefish, and hapuka, yielding delicious catches with amazing table fare.
Depths: Fished from hundreds to thousands of feet deep (100m-650m+), requiring significant distance offshore.
Target Species: Bottom dwellers like Hapuka, Tilefish, Blue-eye Trevalla, Grouper, and Ocean Perch, known for excellent taste.

Equipment:
– Rods & Reels: Heavy-duty, paired with powerful electric reels (winches) to retrieve line.
– Line: Braided line is essential for sensitivity and reduced stretch in deep water.
– Rigs: Specialized rigs with heavy sinkers (1-2kg), circle hooks (9/0 to 16/0), and often glow-in-the-dark lights/beads to attract fish.
– Electronics: High-quality fish finders/sonar to locate structure (ledges, reefs) and bait.
– Technique: Bait (often firm, fresh chunks) must survive the long drop, with lights added to attract attention in the dark depths.
– Difficulty: Requires specialized gear, patience, and skill but offers access to unique, delicious fish.


The BreakAway Impact Shields allow the angler to clip down the hook into the cast position. This makes the rig aerodynamic increasing the casts distance by eliminating the helicopter effect and it also protects the bait in the cast too. Build your own clip down rig.

Earth’s Wildest Waters: The Big Fish
Acht sportvissers reizen de wereld rond en kruisen de hengels op de meest indrukwekkende locaties. Na elke aflevering valt er één deelnemer af – tot er uiteindelijk één winnaar overblijft. Van de ijzige rivieren in IJsland tot tropische wateren in Costa Rica en Cuba. Van de wildernis in Canada tot de rivieren van Laos en Zambia. Onder leiding van juryleden Ben Fogle, Matt Hayes en lokale visgidsen worden de deelnemers beoordeeld op: Hun vangsten Hun technieken Hun creativiteit aan de waterkant. Dit BBC2-programma neemt je mee op expeditie: verrassende vissoorten, uiteenlopende technieken en adembenemende landschappen komen voorbij.

INVOERING RECFISHING APP voor EU Landen, nu verplicht
Sportvissers die in de kustwateren, visserijzone en het zeegebied vissen zijn vanaf dit jaar 2026 vanuit de EU verplicht om zich te registreren in de app RecFishing. Daarin moeten zij ook hun vangsten van zeebaars, paling en blauwvintonijn doorgeven. Dit is onderdeel van het Europese gemeenschappelijke visserijbeleid en dient om beter inzicht te krijgen in de bestandsomvang van de genoemde soorten.
ALTIJD REGISTREREN
Vang je aan of op zee (dit is niet van toepassing op het binnenwater) een zeebaars, paling of blauwvintonijn? Dan dien je dit binnen 24 uur te registreren – ook als je de vis weer terugzet. Vangsten van andere soorten mogen ook in de app worden geregistreerd, maar dat is niet verplicht. Ben je langs de kust of op zee aan het vissen en krijg je controle, dan kan door toezichthouders worden gevraagd om je app registratie op je telefoon te tonen. Voor meer informatie over hoe je de RecFishing app downloadt en de EU login aanmaakt ga je naar www.rvo.nl. Daar kun je ook terecht met vragen en opmerkingen over deze verplichte vangstregistratie.


Yo-Zuri Mag Popper
Yo-Zuri Mag Popper, Big splash, small package The Yo-Zuri Mag Popper 100mm brings the same hard-hitting topwater action in a new, compact size. Built for when fish are keyed in on smaller bait—but you still want that explosive strike. #YoZuri #MagPopper100 #TopwaterGame #ScaledDownNotDialedDown #FishingLife #yozuri #yozuri_lures #fishing #fishinglife

Jigging is an active fishing technique where a weighted lure (a ‘jig’) is moved through the water with rhythmic, vertical movements to imitate injured or escaping predatory fish, often by bobbing the rod tip up and down or quickly retrieving it. It is popular for a variety of species including bass, zander, tuna and snapper, both from the shore (shore jigging) and from a boat.


Penn International VI
The baddest fish that swims ⚔️ requires the baddest big game reel 🎣. The International VI Autostop Electric Reel has become the go-to for the hardcore deep drop swordfishing anglers.

TWIN POWER XD
Unmatched performance for inshore saltwater and heavy-duty lure fishing

Ron’s Tonijnburgers
Ingrediënten (voor 2 personen):
- 2 blikjes tonijn in water (à 160 gram),
- uitgelekt (224 gram)
- 1 ei, losgeklopt
- 6 eetlepels panko (Japans broodkruim)
- ½ bosje peterselie, alleen de blaadjes
- 2 sjalotten, 1 fijngehakt, 1 in dunne
- ringen
- 4 eetlepels mayonaise
- rasp en sap van 1 citroen
- 1 avocado
- 2 witte bolletjes (of andere
- burgerbroodjes)
- 1 bosui, schoongemaakt,
- in dunne ringen
- 4 blaadjes ijsbergsla
- zout en peper
- zonnebloemolie
Bereidingswijze:
Meng de tonijn, het ei, de panko, peterselie en fijngehakte sjalot in een grote kom. Breng op smaak met zout en peper. Voeg eventueel wat extra panko toe als het mengsel te vochtig is. Vorm er dan met de handen 2 burgers van. Leg ze 20-30 minuten afgedekt in de koelkast om stevig te worden.
Meng de mayonaise met het citroenrasp en de helft van het -sap in een kom en zet apart. Snijd de avocado doormidden en verwijder de pit. Lepel het vruchtvlees eruit en snijd het in plakjes. Besprenkel met de rest van het citroensap om verkleuren te voorkomen en zet apart.
Verhit een grillpan op middelhoog vuur. Snijd de broodjes doormidden en rooster ze in de droge pan licht goudbruin. Leg de broodjes apart, zet het vuur hoger en neem de tonijnburgers uit de koelkast. Bestrijk ze aan beide kanten met olie en leg ze in de grillpan. Draai ze, afhankelijk van de dikte, na 2-3 minuten voorzichtig om. Bak tot beide kanten goudbruin zijn en de binnenkant goed warm is.
Stel dan je burgers samen. Besmeer de snijvlakken van de broodjes met citroenmayonaise. Leg op de onderkant van elk broodje twee blaadjes sla. Leg er dan een burger op, gevolgd door wat plakjes avocado, bosui en de sjalotringen, en eindig met de bovenkant van het broodje. Serveer meteen.
The Fathom Electric is an innovative, first of it’s kind reel. Built on the legendary platform of the Fathom II Lever Drag reels, the Fathom Electric powers your game to the next level. Featuring a fully integrated and replaceable Lithium Ion battery pack, you never have to be worried about being tied down with cords or limited to spots with a plug. The Fathom Electric features a true digital line counter based on line diameter inputs, which powers the autostop feature for true hands free retrieval, with override feature if you wish to manually run the speed control. The powerful brushless motor easily handles as much drag as you wish to run, with speeds capable of running everything from chicken rigs to sailfish kites. Kit includes reel, battery and charger.

Z-MAN saltwater lures, the most durable pre-rigged swimmbaits on the market equipped with equally powerful heavy-duty Mustad hooks. EZ ShrimpZ, also perfect for Snook.

RAPALA PRECISION XTREME PENCIL PXRP87.
Precise Design – Xtreme Action! Inside the Precision Xtreme Pencil’s durable and through-wired plastic body is an internal weight system that makes the lure one of the best-casting baits in its category.
Sharpen your knives and come to attention because class is in session! Join Mike Cruz, manager of Greenpoint Fish & Lobster Wholesale, as he details the best methods for cleaning and preparing just about every fish you could encounter in the kitchen. Not every fillet is made the same and learning the proper technique can elevate your seafood game to the next level. So, if you’re ready to learn how to fillet every fish, Mike has you covered and then some.
Sharpen your tools and come to attention because class is in session! Join Mike Cruz, manager of Greenpoint Fish & Lobster Wholesale, as he details the best methods for cracking open and cleaning just about every variety of shellfish you might encounter in the kitchen. Not every crustacean and bivalve plays by the same rules, and learning the proper technique can elevate your seafood game to the next level. So, if you’re ready to get cracking, Mike has you covered and then some.

eSIM to stay connected anywhere in the world!
Choose your destination, activate your eSIM in just a few clicks and stop worrying about roaming charges

Mustad Tracershot Jig
The new Tracershot Jig is designed to match the hatch for pelagic baitfish presentations, whether you’re casting inshore or offshore. Its aerodynamic profile allows for easy casting and its streamlined body reacts quickly to slight movements of the rod tip. Features a Mustad 11837NP-DT hook.


